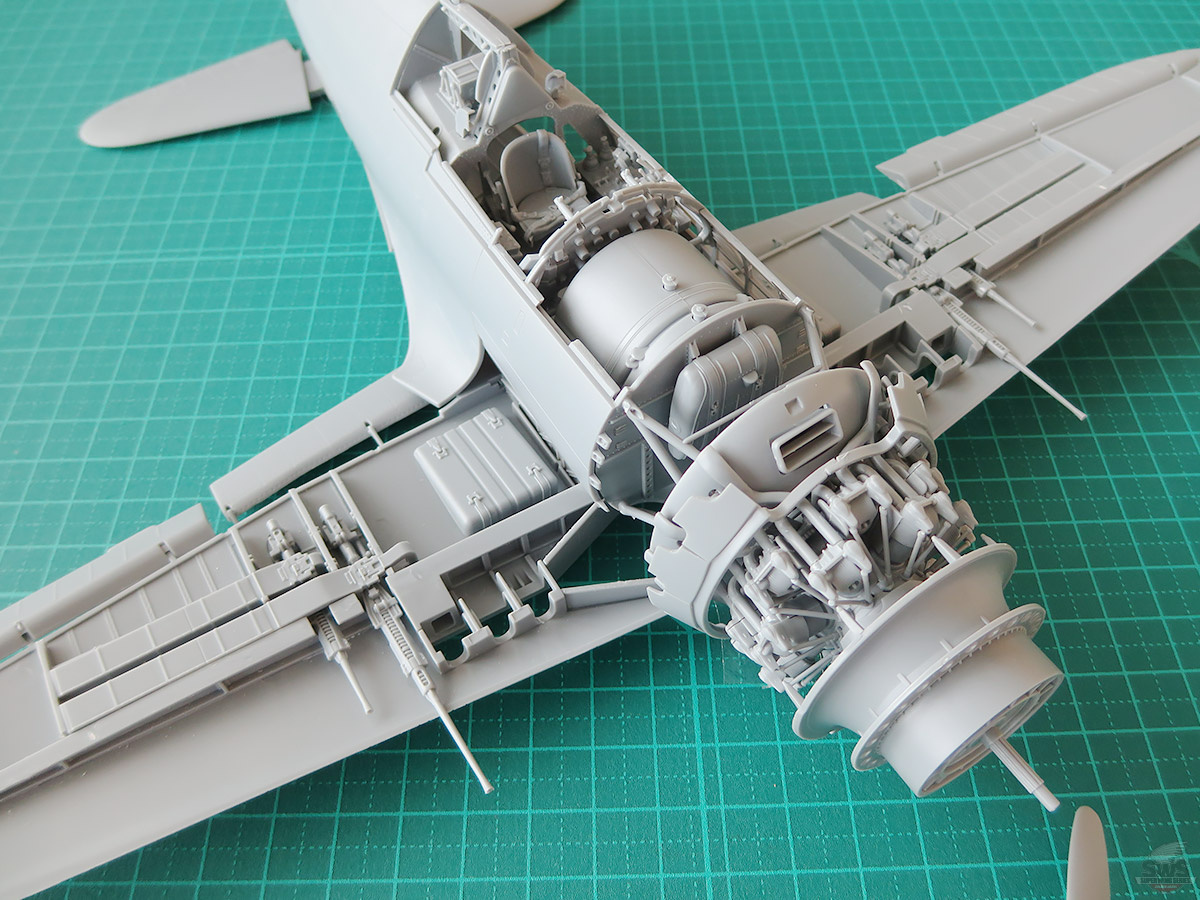
Here is this episode, we will be explaining all the works starting from the cockpit to the main wings then the fuselage.
There is a lot of tiny details and parts around the cockpit inside, which is a hard way ahead for modeler with big fingers like me. Make sure you have a fine tweezers that can enable you to perfectly pick each tiny parts and complete the works stably.
For example, I have been using the favorite ZOUKEI-MURA V Tweezers (Bent) that was hand-made by the closed Oyama Tools from Tokyo for almost 50 years.
Made from stainless steel and the comfortable sense of use will not let you down.
As far as I remember, there are some last pieces in stock in our store, so for those who are interested in having one, please visit our VOLKS stores or VOLKS official online store for more details.

Click Here to Purchase from the VOLKS Hobby Paradise Online Store
I highly recommend you to put a little bit of masking ink on the tip of the tweezers, that will greatly help you to firmly pick up parts.
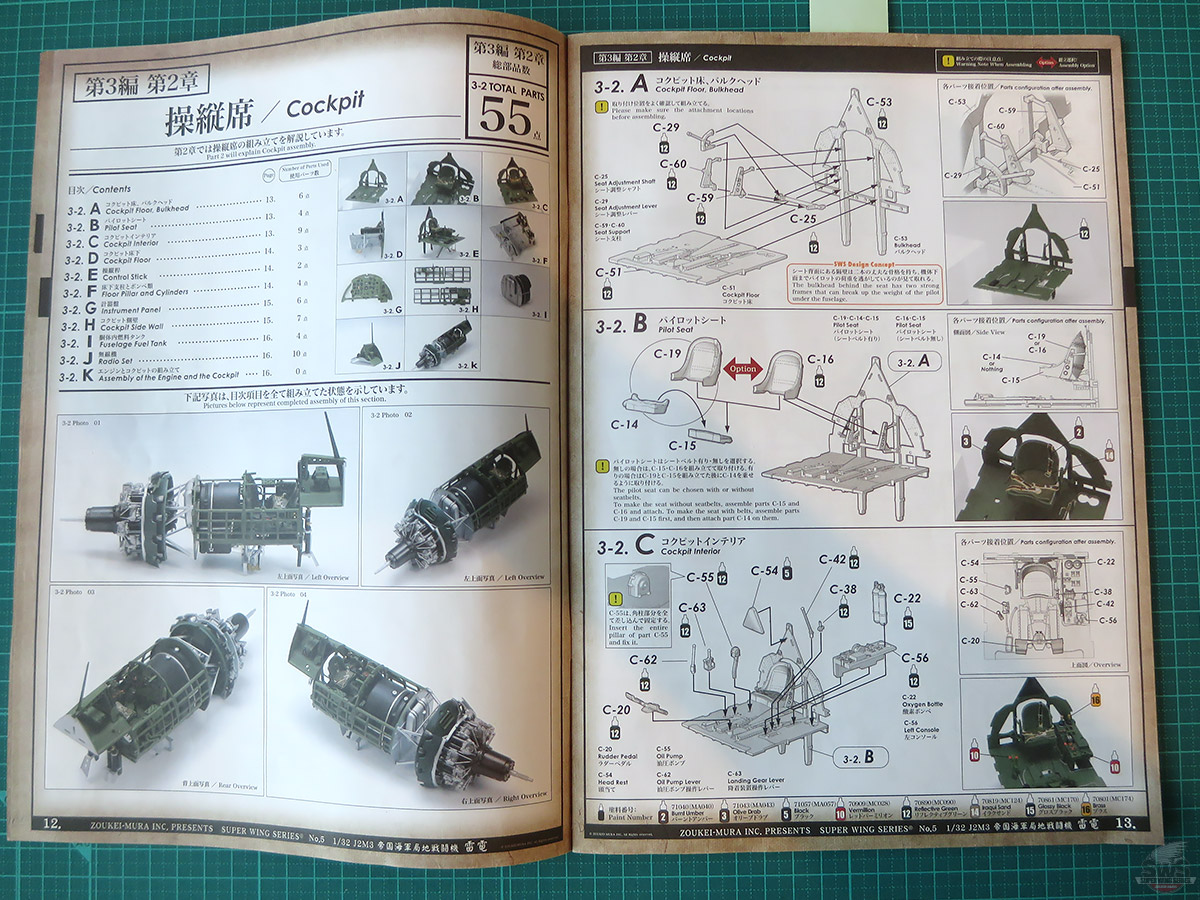
▋The first part of the works on cockpit is C-60 and 59, then the C-25, the base of the pilot seat however where is also the most tricky part of SWS kit. Because in order to truthfully recreate it in a scale model, the parts are made as detail as possible and somehow increase the toughness of the assembly. Also once you have attached the seat, the details will not be visible but this step is absolutely can not be skipped. After that, there will be continuous works on gluing those tiny parts, so make sure you follow the instruction to cut them off from the runner and place them accordingly, then proceed step by step with careful confirmation.
This is exactly what we said a journey of a thousand miles begins with a single step.
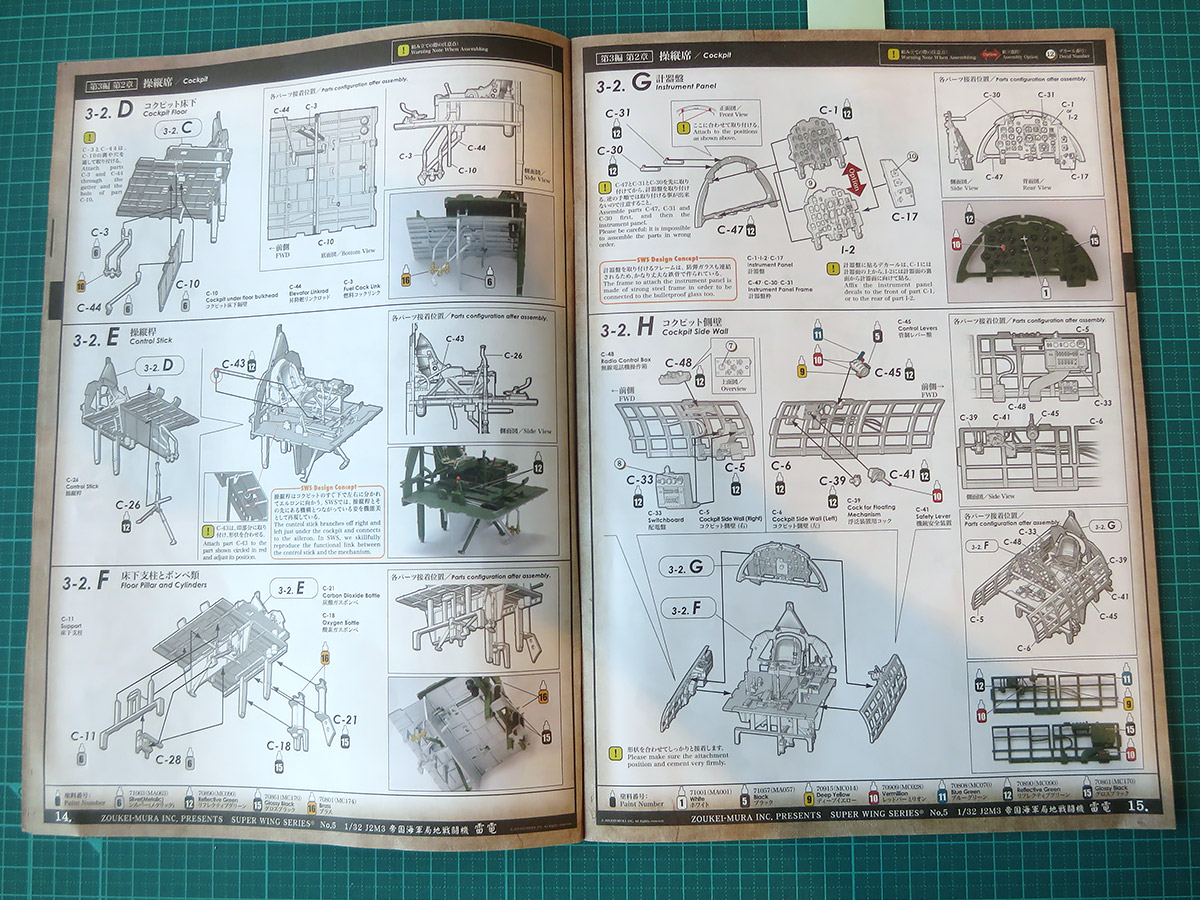
▋The most important thing about the works from 3-2.D to 3-2.F is the angle to attach the parts. Make sure you understand and follow the instruction for this part, or you will regret that you should have paid more attention when you realize that they are not well matched after the assembly with fuselage and the main wings.
But even in that case, it still can be fixed so please do not feel too much pressure. However, if you can correctly complete this part, you will be surprised for the amazing outcome that the assembly with fuselage and main wings is so perfect, which I hope to hear your cheers by then.
Besides, you should also be careful with the direction when attaching the instrument panel parts of 3-2.G "C-30", as this is designed to assembled with the bulletproof glass in rear, and please find more details in the p.35 for the assembly instruction.
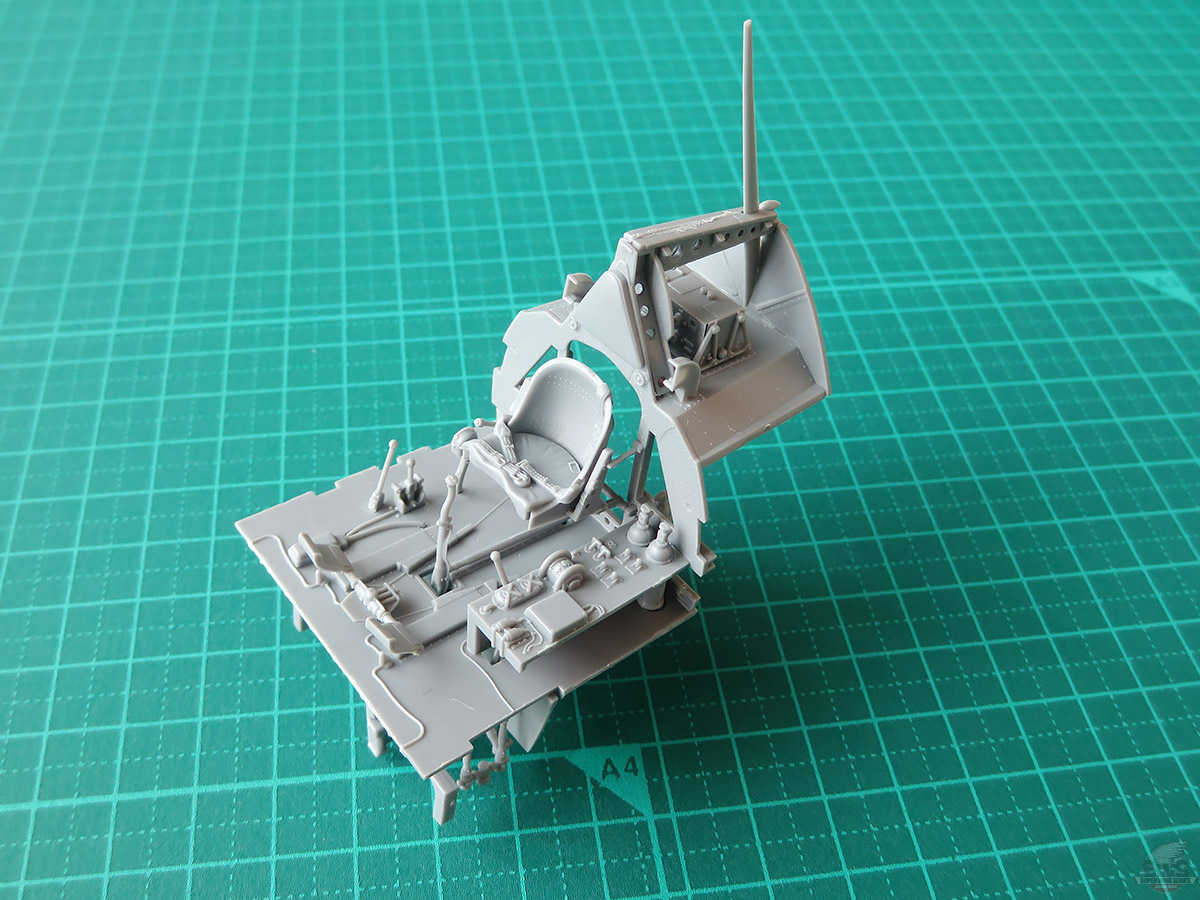

▋And the works on cockpit is officially completed. Although you can see there are something like pipe sticking out, you will find the reason later and I can guarantee you that you will be surprised if are able to correctly finish this part.
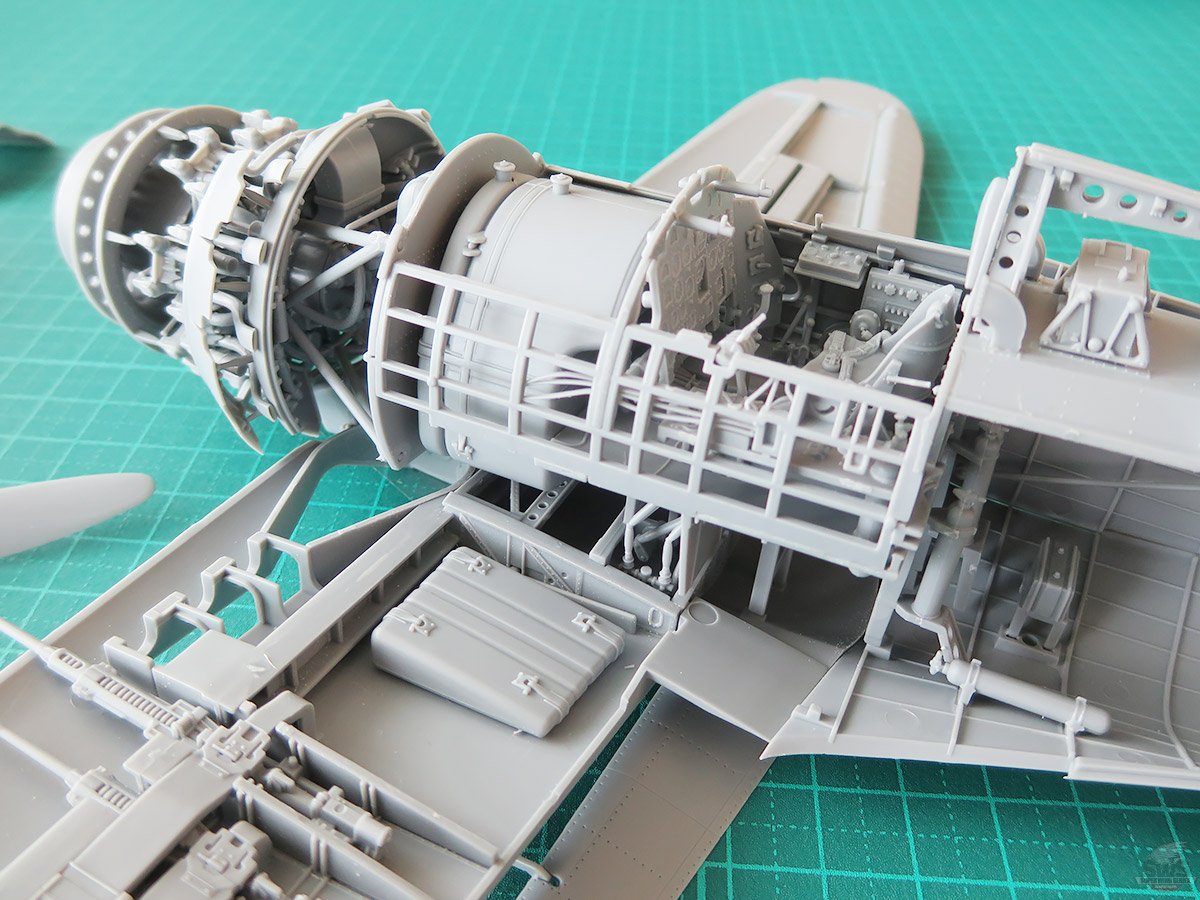
Please be careful not to damage or bend those sticking out tiny parts with your fingers or tools that would ruin your effort on recreating the details, given that the area around the engine and cockpit is the highlight of Raiden, I hope you will enjoy building this part.
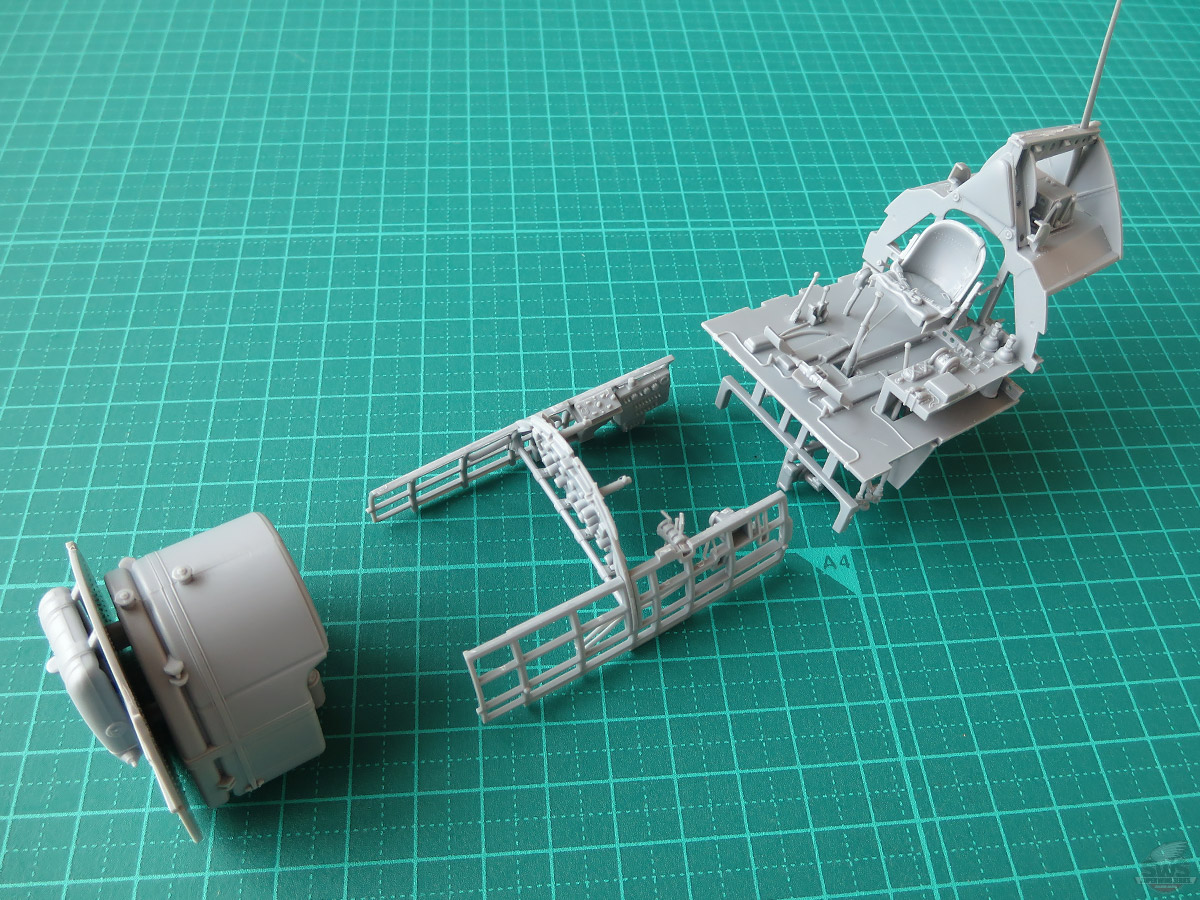
▋When you take a look at the completed Raiden cockpit, this is the moment you find that it is rare in Japanese airplane for its comfortable space and size. Especially when you compare it with the SWS 32 Bf 109 G-14/U4 that released earlier, you can’t help but to wonder how the fuselage could hold this big cockpit and I believe the pilot back that time should have had the same question.
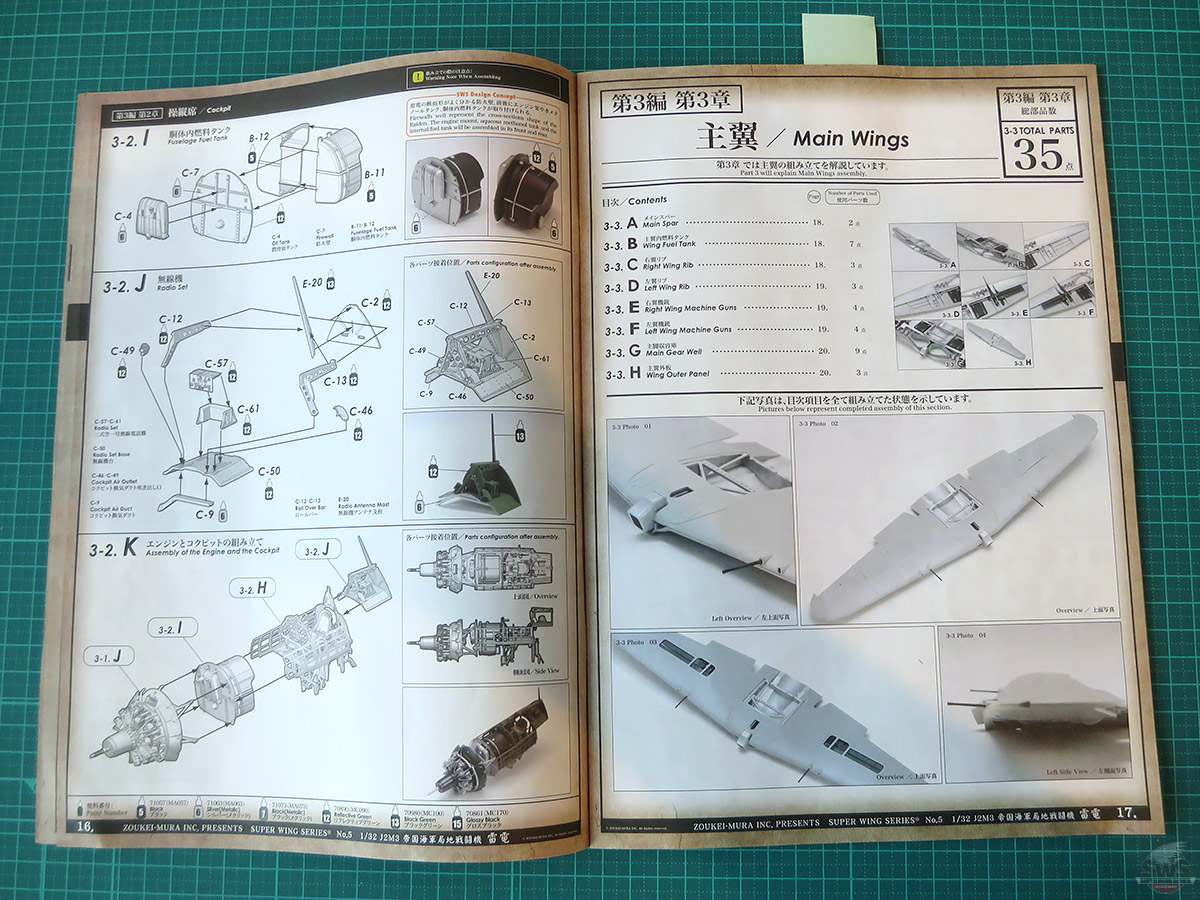
Next, we will move to the works on the main wings.
Given that this is an early SWS kit, you will see a lot of places that was actually the result of compromise between the designer and the mold creator.
Where is also the uniqueness of a 1/32 scale big kit, however on the other side, it is also the record of the battle against the development schedule and budget. I personally wanted the rib and the barrier wall of the main wings and fuselage to be detailly recreated, but it would definitely reflect on the price and possibly have negative impact on the sales.
Although I have my brothers who would unconditionally support as long as it is a SWS kit, I still need to be careful when determining the price.
Therefore, I am more than grateful for those who choose to purchase and have SWS kit into their collection. Thank you so much for your support~~~!!
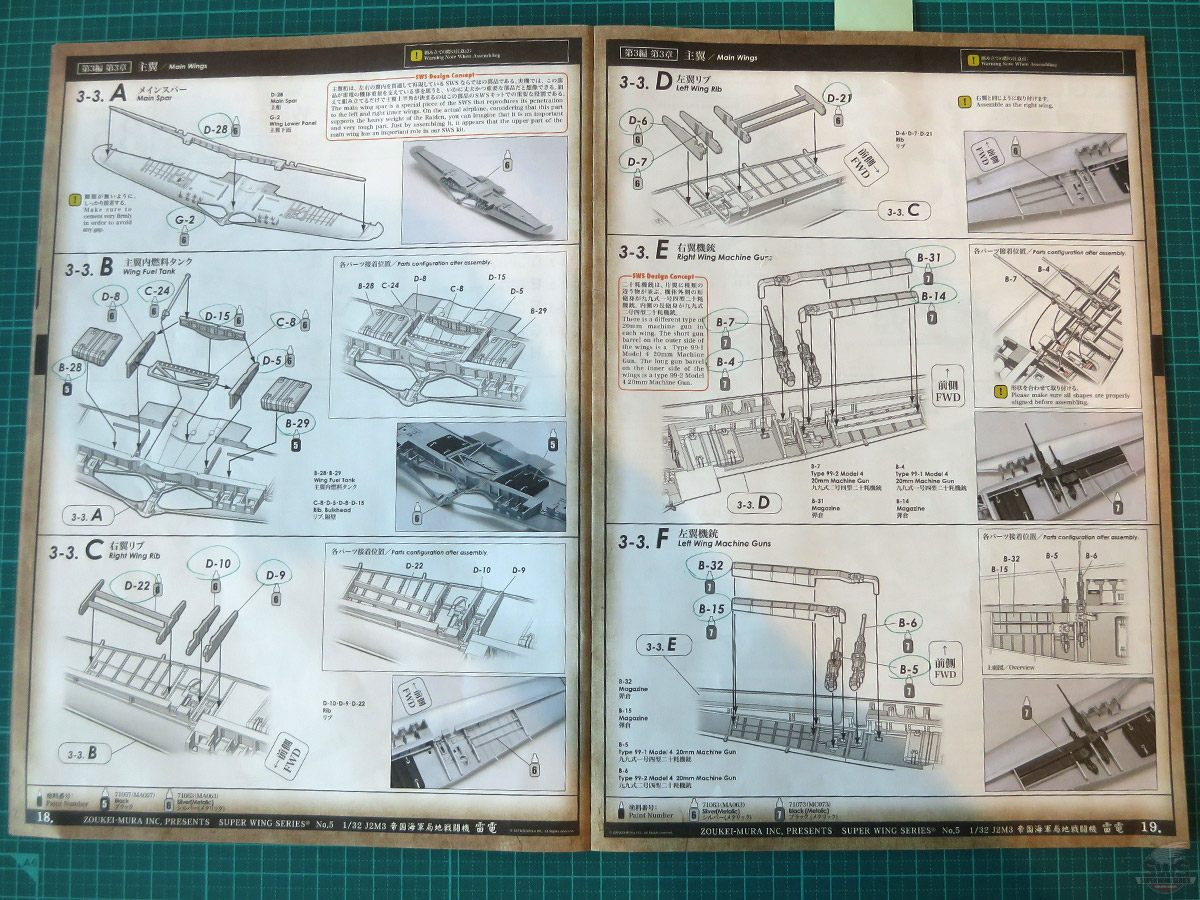
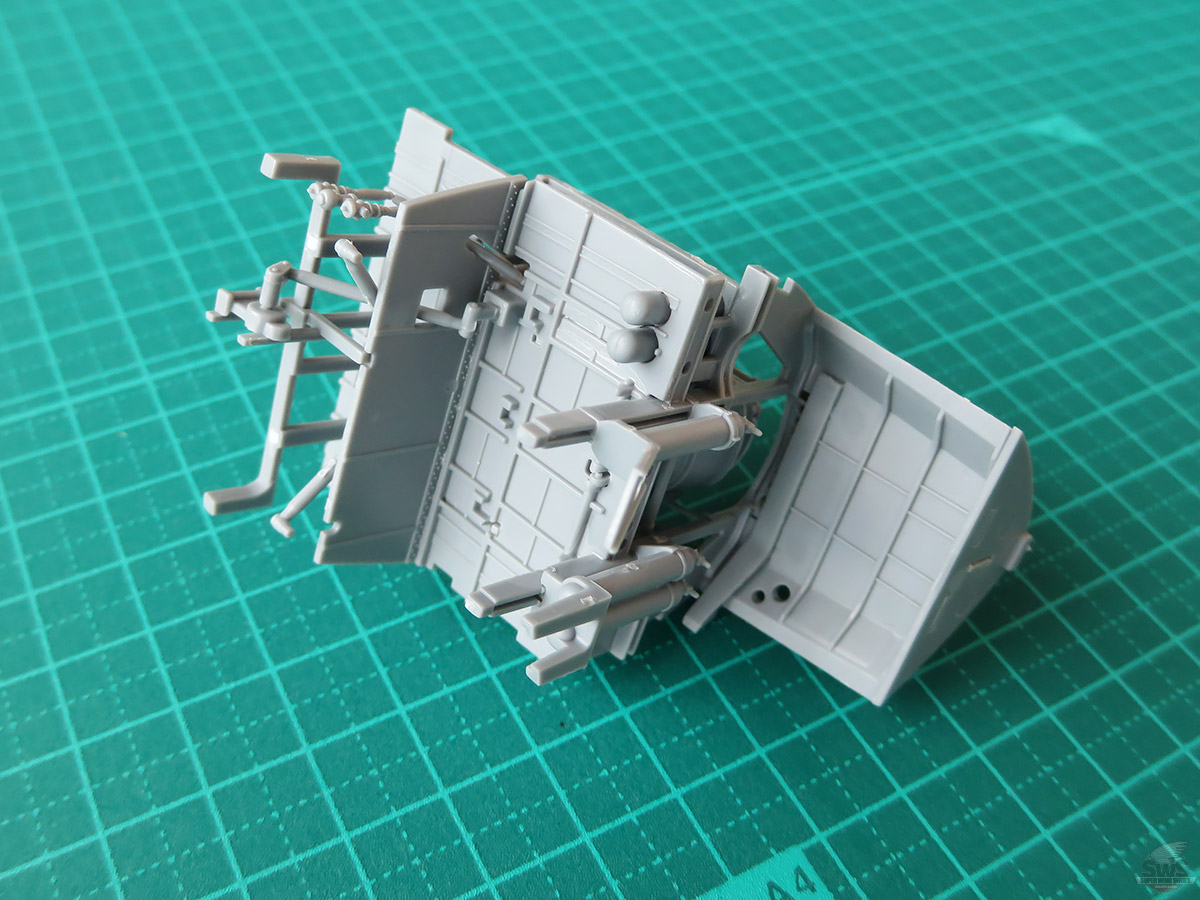
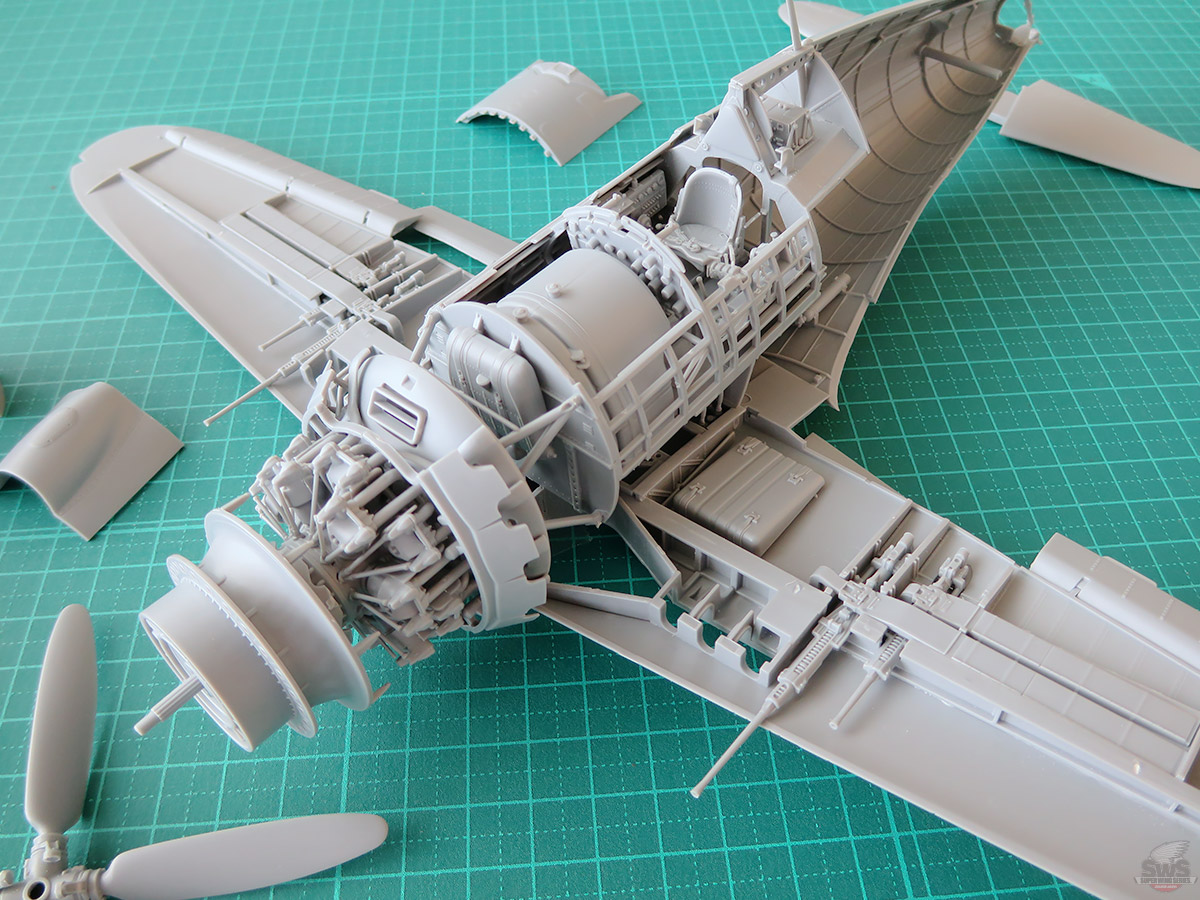
▋Here we move to the works on the main wings. There will not be too much problem if you carefully follow the instruction, however, it probably will make you cry at the step of gluing the machine gun of 3.3E.. Although the detail is well recreated, it is still quite trouble that the most important info of the attaching direction is not clear. But worry does not help, so you should just hold the gluing area with your fingers and look from the opposite side of the main wings to confirm if the ejection port of the gun is matched to proceed to the further steps. If the magazine parts could perfectly assembled with the gun, it means you are on the right path.
Please forgive me for accidentally spending too much time in this part!
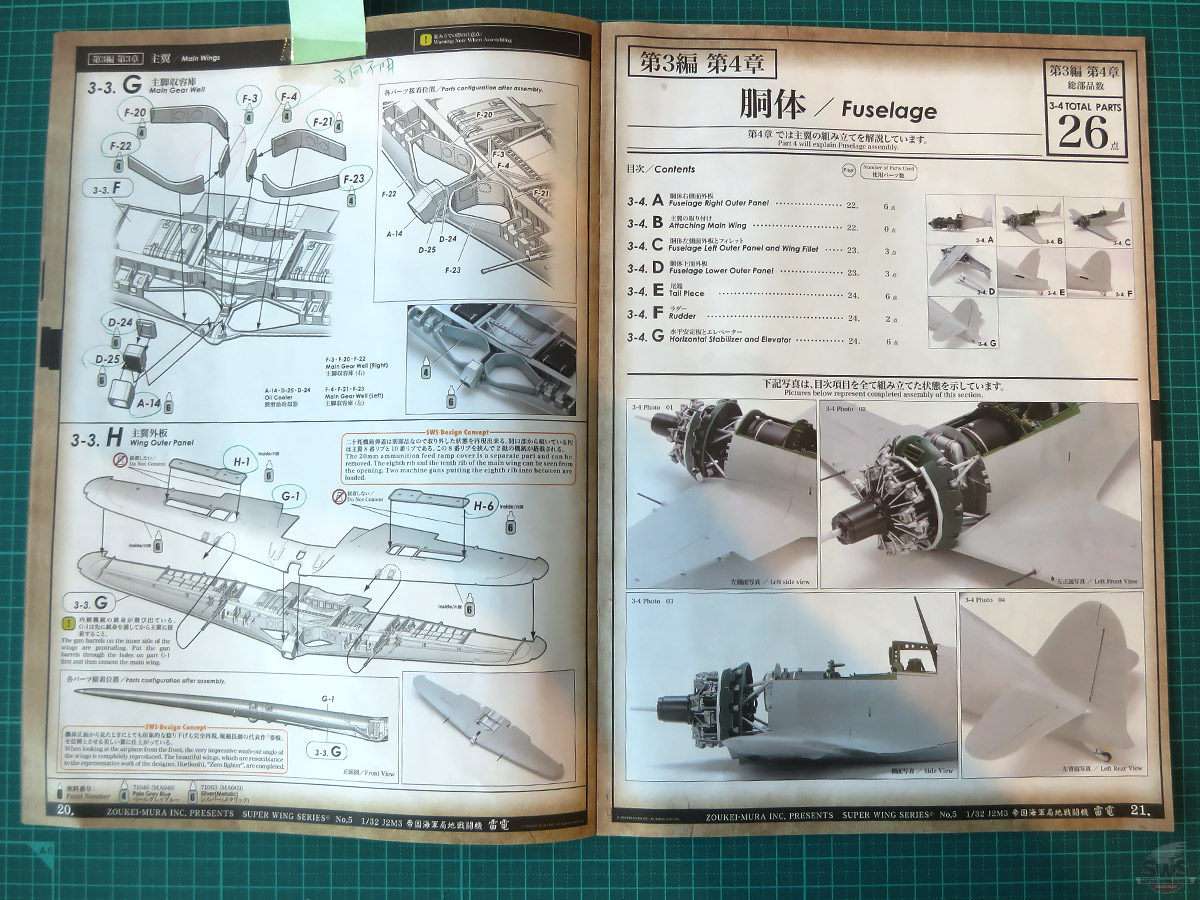
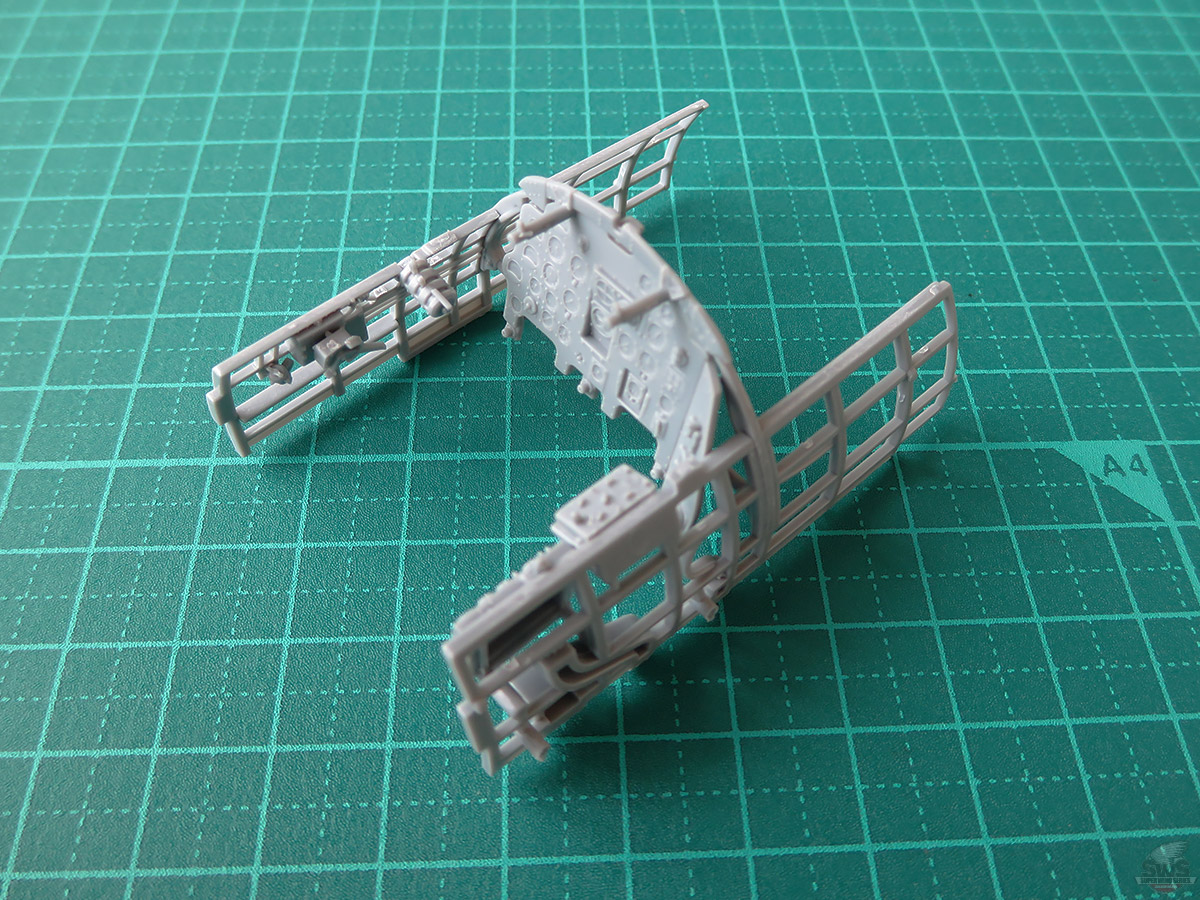
▋In 3-3.G, you should be careful for the angle of each F-22,F-20 and F-3 parts. They should be perfectly assembled if everything is correct, so please make sure where your would like to attach the parts first and then use fluid type to glue it to the correct place. FYI, in order to show you the structure of the airplane, the left wing of the Raiden in this blog is build in skeleton. Although the effort you put on the painting and assembly might not be visible after it is completed, every time you look at the completed kit of its energetic structure you can feel like it is coming back to life. Don’t slack off and keep going!
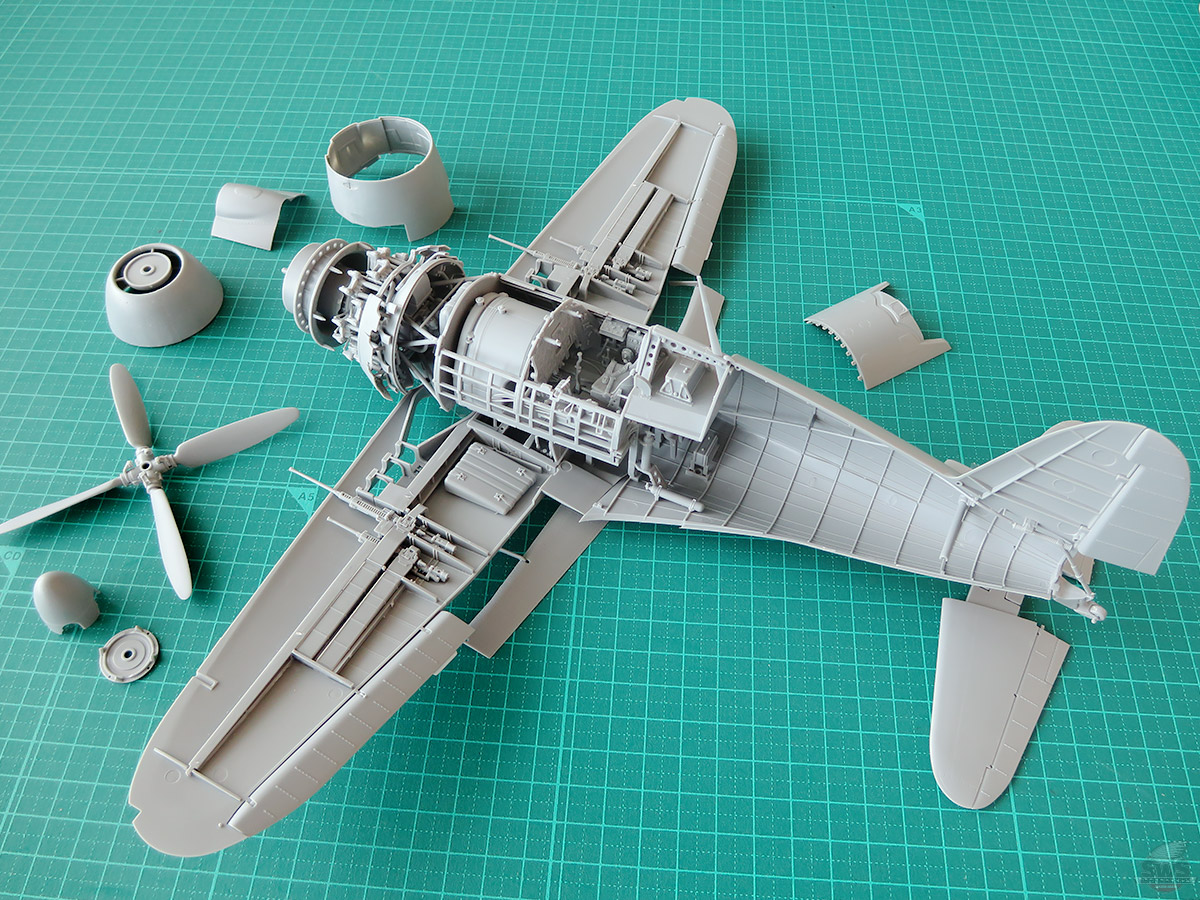
Finally the main structure and the fuselage of Raiden is getting more clear.
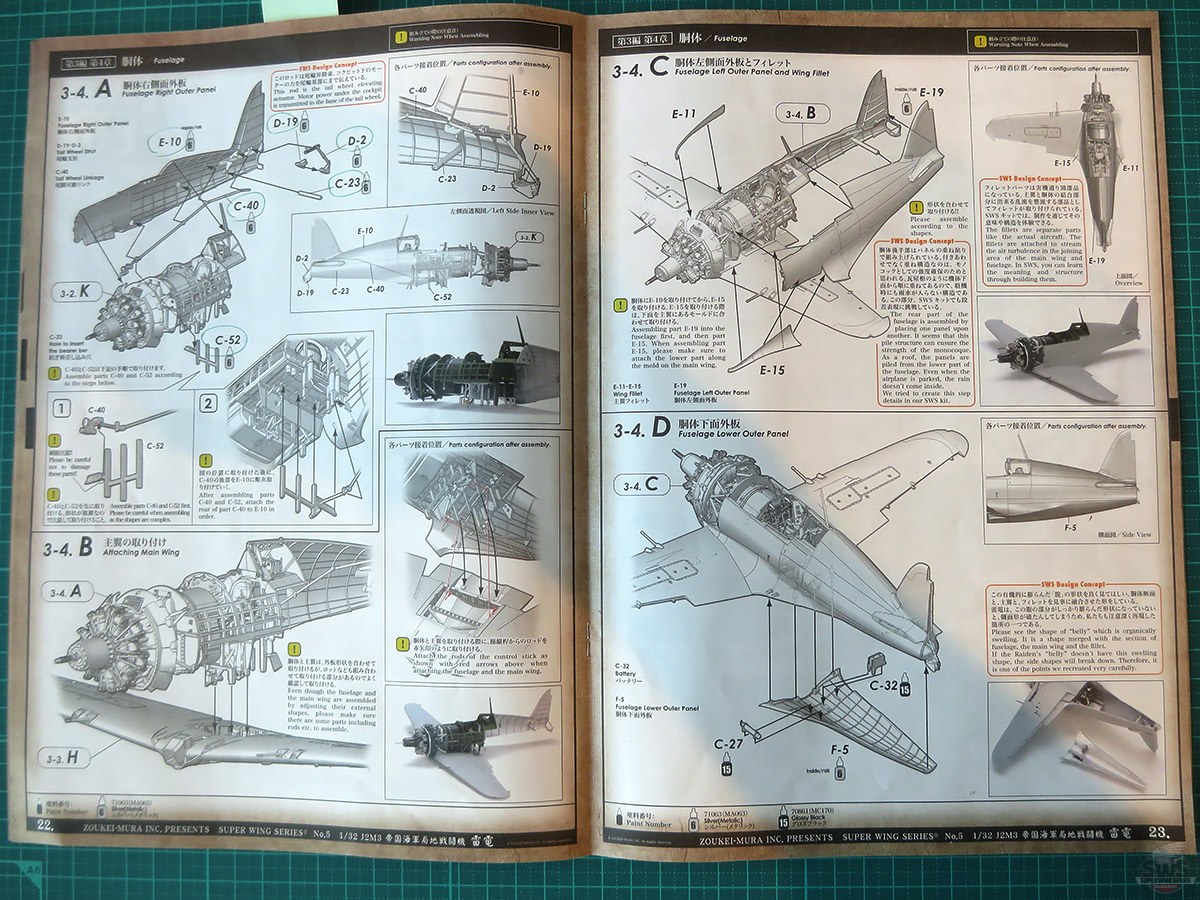
Especially you will find the work here will require you to correctly assemble each parts to the right place, so please be patient and take your time. However, if you find a parts that cannot be perfectly assembled, it is the proof that you have probably mistaken something in the early steps. Besides, the left, right and bottom areas of the fuselage that need to be glued, will require you to make the best use of instant glue while determining the gluing area and keeping it firmly.
In order to not fail on this part, please do not feel pressure on using instant glue and take your time on it.
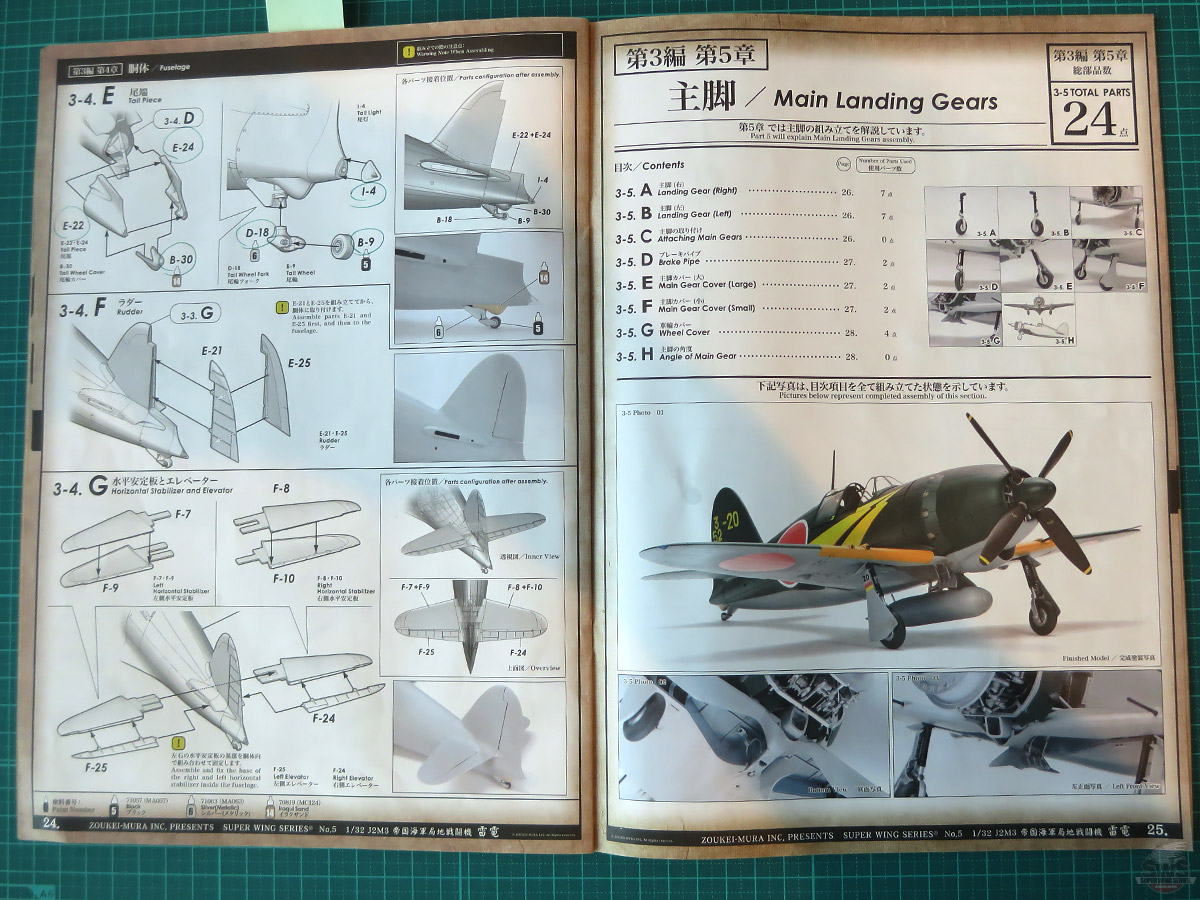
▋Now we have come to the part of fuselage.
Finally, the engine, cockpit and the structure of fuselage are coming into one and if could complete each task ahead correctly, the main wings and the fuselage should fit each other perfectly. Sometimes you might have trouble in assembling the parts because the tiny details beneath the cockpit is not well attached, therefore, you should always try to find out the real problem rather than just force to assemble them.
Sometimes you can only dry laugh when you find out the real problem is a tiny detail.
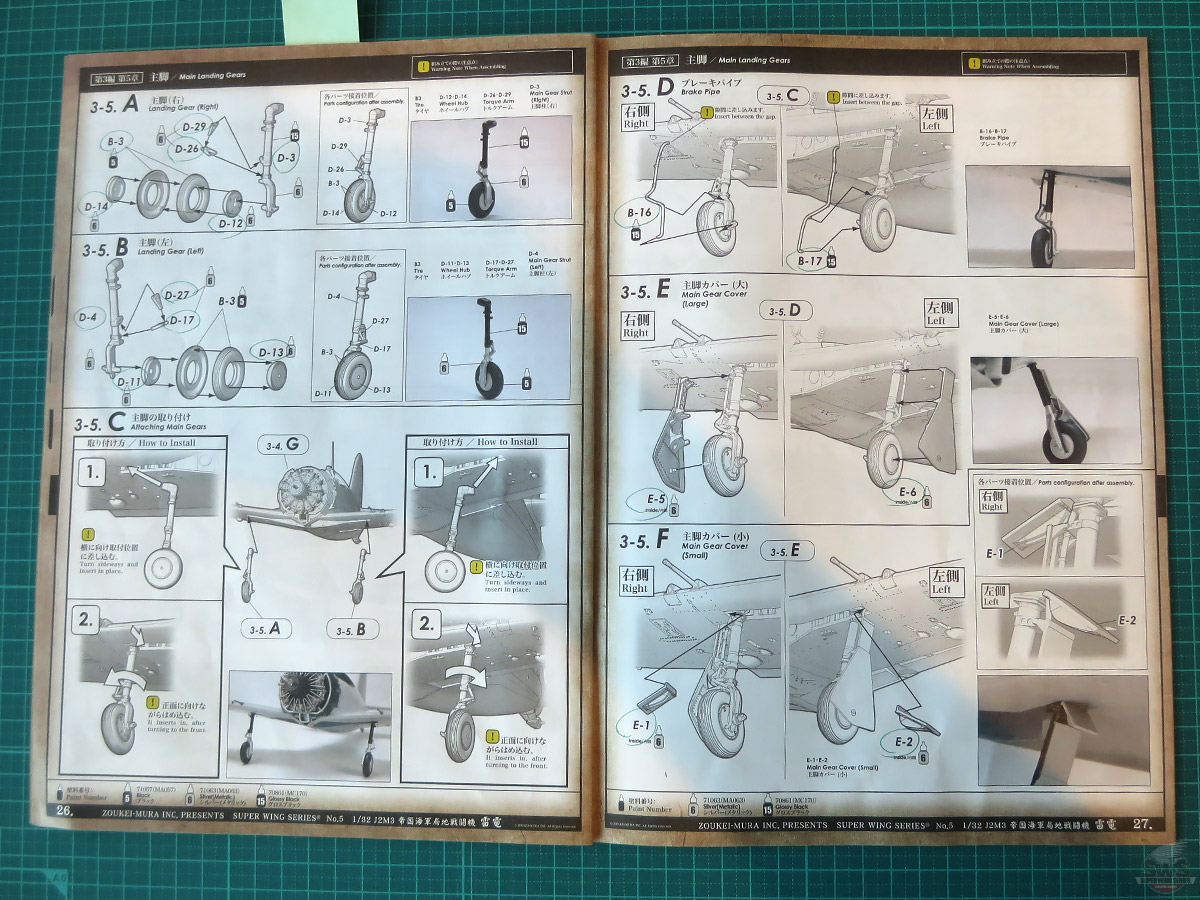
▋Here is the works on landing gear. This is exactly where you need to pay attention to the angle. Especially the brake pipe is easily mistaken, which you should be careful and also the cover in 3-5.F.
There is slightly different in the attaching angle for the side and front area of main struct for Raiden, and you could better recreate the personality of this plane by correctly completing each tasks.
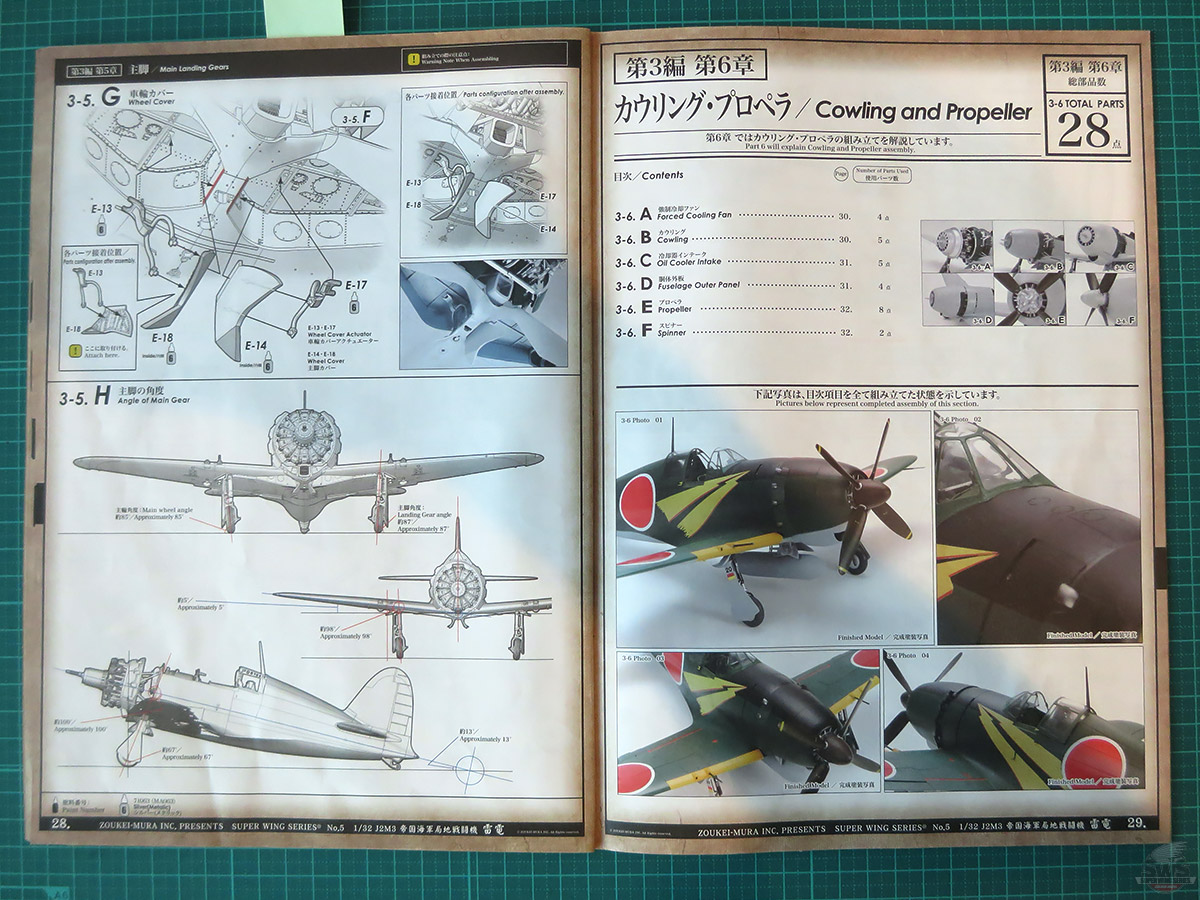
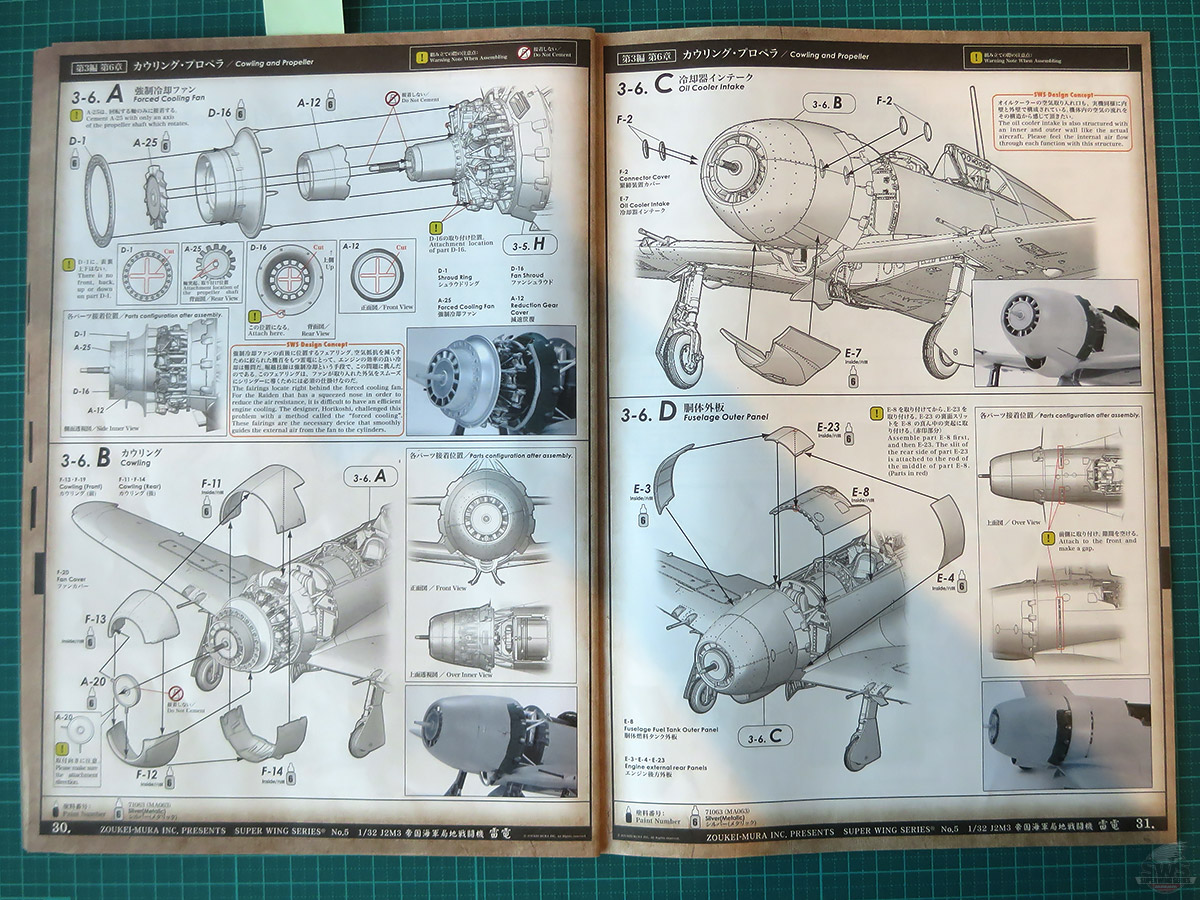
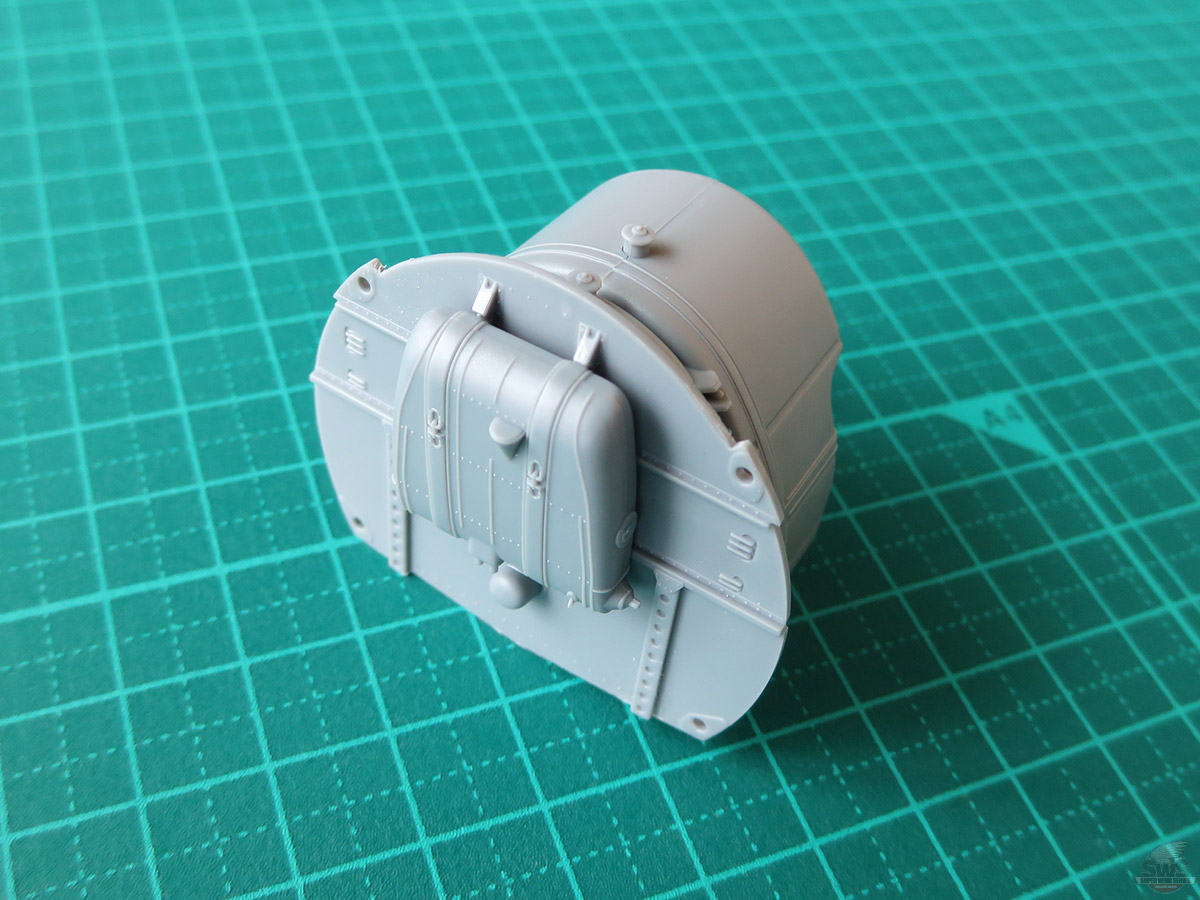
▋Finally we have come to the highlight of the engine parts, where is also the key factor to determine the face of Raiden- the cowling. In 3-6.A, first we look from the front side of engine to confirm the dent location in D-16 picture then to insert it. It should perfectly fit in the earlier tasks were correctly finished, Then in 3-6.B, you should correctly assemble F-13 and F-12 then attach them with A-20. The gluing area is extremely small, so please make sure to confirm the intensity after it fully dry. If you are able to correctly process the parts cut off from the gate, they should be perfectly attached to each positions.

And this is what we have for this episode on the works of SWS Raiden.
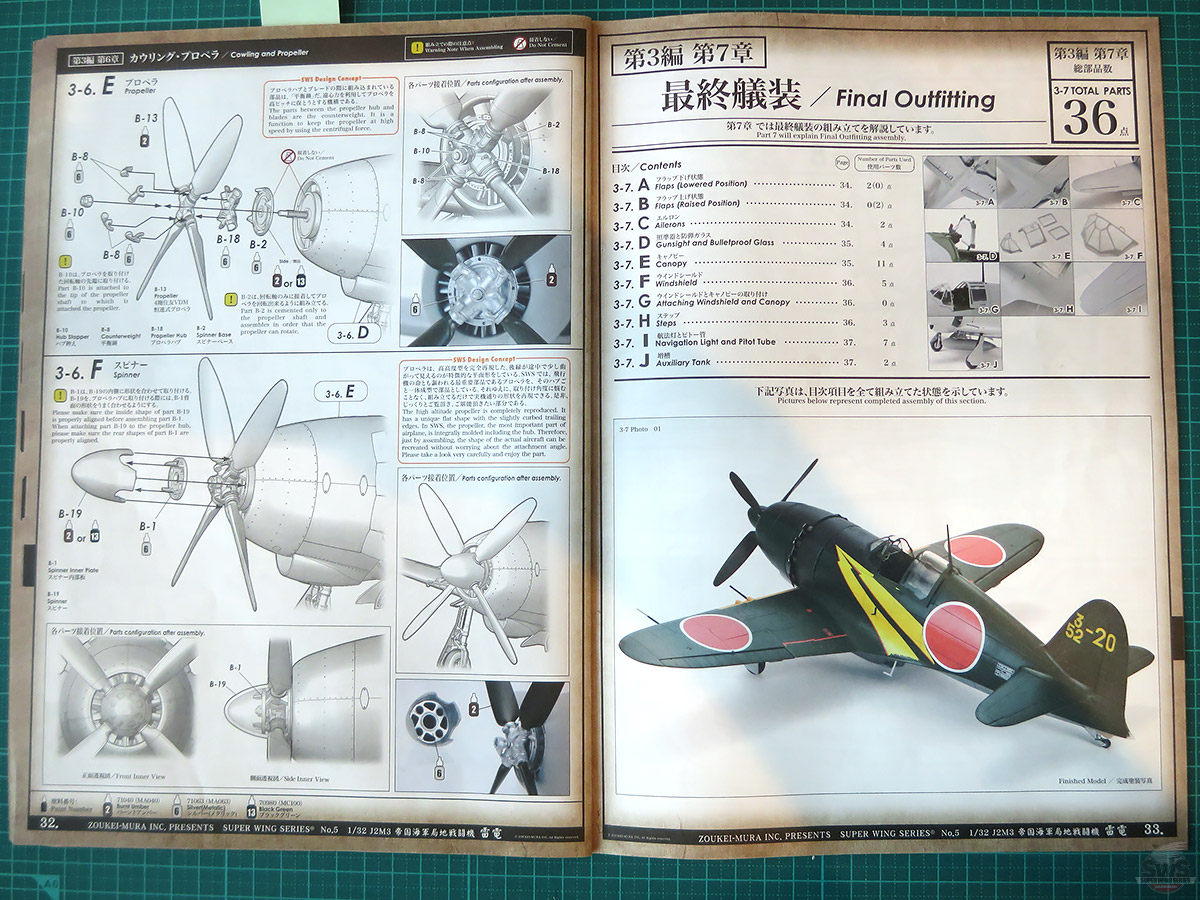
The next episode will be the topic on final outfitting starting from the canopy, aileron, flap and other details closing works.
If you happen to have a "Zero" in your collection, please don’t hesitate to put it beside Raiden for comparison, and it will again remind us the concept of the design and the reason why the front line desperately asking this airplane to be created.
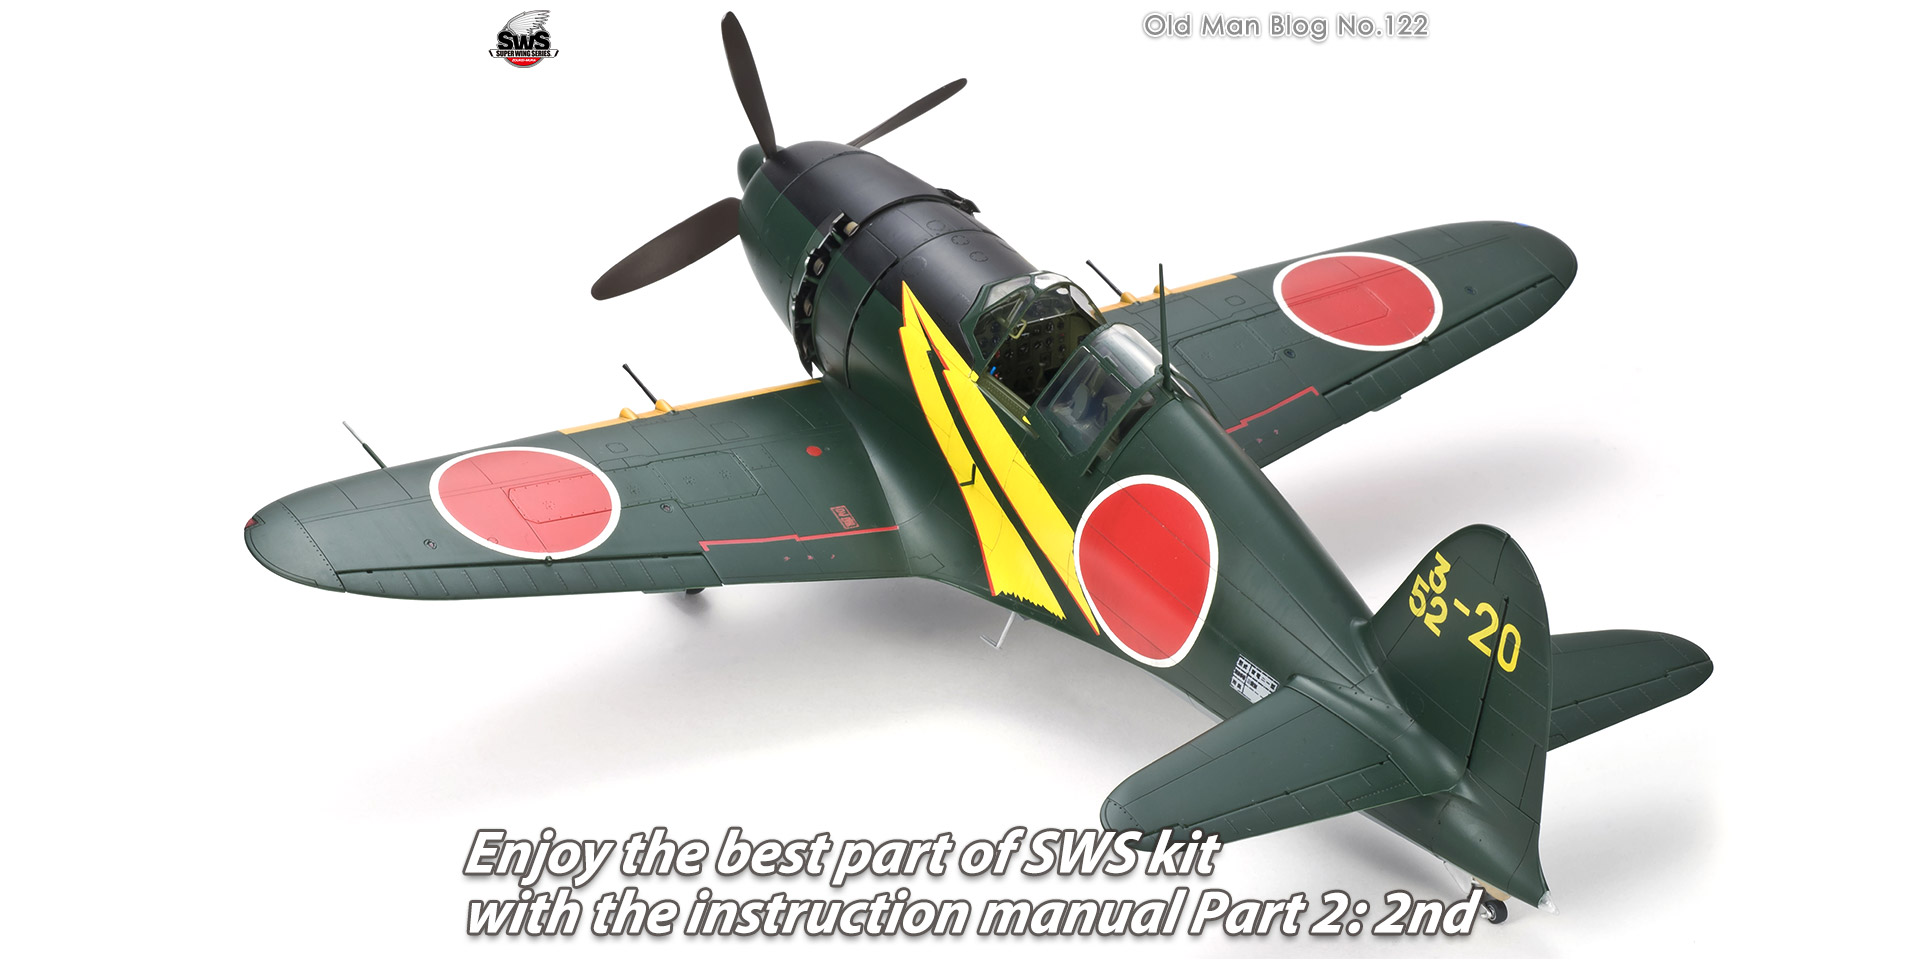
Please enjoy the top of the Japanese Navy airplane, the ultimate interceptor aircraft-Raiden and hope it will one day be added to your collection.
See you on the next final episode on the introduction of Raiden!!
Hideyuki Shigeta
President, Zoukei-Mura
![]()

 Old Man Blog No.121Enjoy the best part of SWS kit with the instruction manual Part 2
 Old Man Blog No.123Enjoy the best part of SWS kit with the instruction manual Part 2: Last Part